This post is my notes drawn from Official Android Docs and Android O: How to Use Notification Channels.
A notification is a message you display to the user outside of your apps UI.
When you tell the system to issue a notification, it first appears as an icon in the notification area like below:
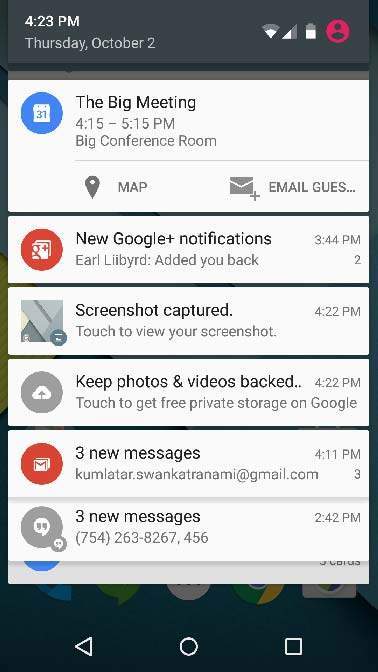
To see the details of the notification, the user opens the notification drawer like below:
Both the notification area and the notification drawer are system-controlled areas that the user can view at any time.
On devices running Android 8.0 (API level 26) and higher, apps can also display notification badges on app icons. Users can also long-press on an app icon to glance at the notifications associated with a notification badge like below:
Note: To learn how to design notifications and their interactions, read the Notifications design guide.
Starting Android Oreo, Notification Channel is introduced. It is an exciting feature that allows notifications to be grouped into channels. A developer can create a different channels for an app, based on some criteria. And the app user will have the ability to modify the notification settings for the entire channel at once. This feature aims to improve the UX of an app.
When you target Android 8.0 (API level 26), you must implement one or more notification channels to display notifications to your users. If you don't target Android 8.0 (API level 26) but your app is used on devices running Android 8.0 (API level 26), your app behaves the same as it would on devices running Android 7.1 (API level 25) or lower.
Users can manage the notifications by visiting Settings, or by long-press a notification to change these behaviors, or even block a notification channel at any time. All notifications posted to the same notification channel have the same behavior. When a user modifies the behavior for any of the following characteristics, it applies to the notification channel:
Steps to build Notification
Step 1: Create NotificationManager from SystemService like below:
Step 2.1: Create NotificationChannel object per Channel, with the desired options like below:
Step 2.2: Create Notification Channels you want via the NotificationManager like above (see createChannels() method).
Step 3.1: Create Notification object using Builder passing required message like below:
Step 3.2: Notify the user via NotificationManager.notify(notification) like below:
Note: You can get all notification channels for an app with getNotificationChannels() and get a specific channel with getNotificationChannel(channelID).
Note: Starting Android O, priority levels are deprecated for individual notifications. Instead, you set an importance level when creating a notification channel using any of the values - IMPORTANCE_NONE, IMPORTANCE_MIN, IMPORTANCE_LOW, IMPORTANCE_DEFAULT, IMPORTANCE_HIGH, IMPORTANCE_MAX. All notifications for a channel will be given the same importance level.
Note: You can delete notification channels by calling deleteNotificationChannel().
A notification is a message you display to the user outside of your apps UI.
When you tell the system to issue a notification, it first appears as an icon in the notification area like below:
To see the details of the notification, the user opens the notification drawer like below:
Both the notification area and the notification drawer are system-controlled areas that the user can view at any time.
On devices running Android 8.0 (API level 26) and higher, apps can also display notification badges on app icons. Users can also long-press on an app icon to glance at the notifications associated with a notification badge like below:
Note: To learn how to design notifications and their interactions, read the Notifications design guide.
Starting Android Oreo, Notification Channel is introduced. It is an exciting feature that allows notifications to be grouped into channels. A developer can create a different channels for an app, based on some criteria. And the app user will have the ability to modify the notification settings for the entire channel at once. This feature aims to improve the UX of an app.
When you target Android 8.0 (API level 26), you must implement one or more notification channels to display notifications to your users. If you don't target Android 8.0 (API level 26) but your app is used on devices running Android 8.0 (API level 26), your app behaves the same as it would on devices running Android 7.1 (API level 25) or lower.
Users can manage the notifications by visiting Settings, or by long-press a notification to change these behaviors, or even block a notification channel at any time. All notifications posted to the same notification channel have the same behavior. When a user modifies the behavior for any of the following characteristics, it applies to the notification channel:
- Importance
- Sound, Lights, Vibration
- Show on Lock Screen, DND etc.
Steps to build Notification
Step 1: Create NotificationManager from SystemService like below:
Step 2.1: Create NotificationChannel object per Channel, with the desired options like below:
Step 2.2: Create Notification Channels you want via the NotificationManager like above (see createChannels() method).
Step 3.1: Create Notification object using Builder passing required message like below:
Step 3.2: Notify the user via NotificationManager.notify(notification) like below:
Note: You can get all notification channels for an app with getNotificationChannels() and get a specific channel with getNotificationChannel(channelID).
Note: Starting Android O, priority levels are deprecated for individual notifications. Instead, you set an importance level when creating a notification channel using any of the values - IMPORTANCE_NONE, IMPORTANCE_MIN, IMPORTANCE_LOW, IMPORTANCE_DEFAULT, IMPORTANCE_HIGH, IMPORTANCE_MAX. All notifications for a channel will be given the same importance level.
Note: You can delete notification channels by calling deleteNotificationChannel().


